
Safety and Instructions
How to setup & tear down a Bouncer
How to setup & tear down a Bouncer with Slide

Donwload - Safety Rules
- All participants are to remove all footwear, eyeglasses, jewelry, and other sharp objects before entering the unit.
- Inflatables are to be under constant adult supervision at all times to ensure that children follow all safety rules and avoid rough play.
- Children of different sizes should not play together in the inflatable together.
- Children are to refrain from horseplay or other dangerous behavior. Please do not jump off walls, perform backflips, throw people, or jump into people while inside the inflatable
- Do not bounce or play near the entrance of the inflatable
- No food and drink are allowed in the inflatable
- During bad weather, including rain, lightning, or heavy wind, please exit the inflatable and turn off the equipment
- If the inflatable deflates unexpectedly, evacuate all participants immediately. Check the power cord and circuit breaker for a broken circuit. If there is nothing wrong with the circuit, please contact us immediately.
- Individuals with health concerns should not enter the inflatable. This includes people with head, back, or neck injuries, other muscular or skeletal injuries, people with disabilities, heart conditions, recent surgery, and anyone else who may be susceptible to injuries from falls, bumps, or bouncing.
- Pregnant women and infants should not enter the inflatable.
- Inflatables can flip over in high winds. Unload participants immediately and deflate the inflatable if wind speed exceeds 14 mph (25 km/h).
- Inflatables are to be anchored to the ground with spikes or sandbags. At no time should they be removed.
Donwload - Setup Instructions
1. Find the most level part of the field/surface where the inflatable is to be set up. Measure the area to ensure that the inflatable will fit. Ensure there is enough vertical clearance from power lines, trees, etc. Inflatables can be set up on gentle slopes and mildly bumpy surfaces but the more level, the better. If the inflatable is to be set up on a hard surface, such as concrete or asphalt, tarp must be placed under the unit to prevent damage to the unit.
2. Place the folded inflatable in the center of the area. Unroll and unfold the inflatable.
3. Close all open zippers on the unit that are used when deflating the unit.
4. Attach the outlet of the blower into the inlet tube of the inflatable and secure the Velcro strap or tie. If there is an unused inlet tube, fold and tie it together in a way to prevent air from escaping.
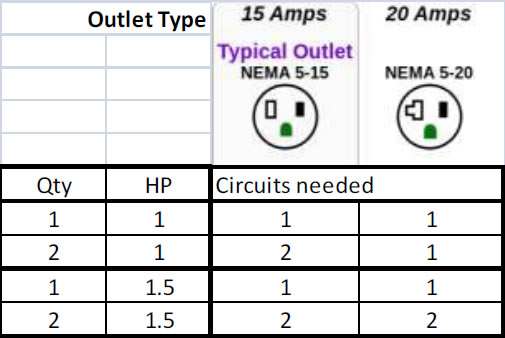
5. Connect the blowers to an electrical source. Note that blowers are 8½ amps for a 1 hp blower and 12½ amps for a 1½ hp blower and different circuits (not just outlets) may be needed. Consult the chart to the right to determine the number of circuits needed. Ensure that the electrical cables are not in a place where people may trip on them
6. Inflate the inflatable by turning on the blower switch. It is normal for parts of the inflatable get “stuck” while inflating. If that happens, pull the “stuck” part of the inflatable to get the parts unstuck. Inflating takes anywhere between 1- 2 minutes. The blowers must be kept on when the inflatable is in use or it will deflate.
7. When the inflatable is fully inflated, the inflatable can be repositioned as necessary; however, do not drag the inflatable if it is on a hard or abrasive surface as this may cause severe damage to the inflatable.
8. If used outdoors, the unit must be anchored down with either the stakes or sandbags that are provided. If using stakes, ensure that the stakes are hammered well into the ground as to not create a tripping hazard.
Donwload - Disassembly Instructions
1.  Ensure that there are no foreign objects or people inside the inflatable. If there is water in or on the inflatable from rain, dry the inflatable first. To dry the inflatable, inflate the unit with the blowers and leave inflated for at least half an hour.
2. If not done so already, turn the blowers off.
3. Unzip the deflation zippers to expedite the deflation.
4. Allow the inflatable to completely deflate.
5. Remove any stakes or sandbags attached to the inflatable
6.  Fold the walls of the inflatable that droop over the base inwards so that the base is the edge.
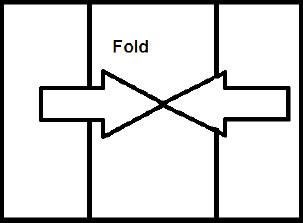
7. Fold the walls of the inflatable into the center as in the diagram on top.
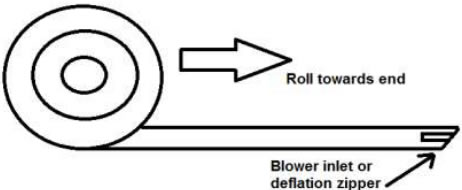
8. Roll the unit slowly from one end to another as in the diagram on the right. Rolling it towards either the deflation zipper or blower inlet will make forcing the air out easier.
9. Secure the rolled up inflatable with the fastening ties.
Do you offer delivery services?
Yes! We deliver to the GTA and surrounding areas.
What are the Delivery Charges?
What about set-up?
Can we pick up our order?
What type of power source do I need?
Where can I set up the equipment?
What kind of supervision is necessary?
How long in advance of my event do I need to book?
Do you have a rain policy?
How do I know will the equipment fit in my space?
How to make a reservation?
Do you have promotions for public events?
Does Aeroideas Jumping Castles carry a TSSA license?
Aeroideas Jumping Castles is insured?